Magic VLSI vs. Cadence Virtuoso
Thomas Figura and Aidan McNay
April 30th, 2023
One of the consistent worries and reservations surrounding open-source tools is whether there is a drop in quality in comparison to commercially available alternatives. Surely a community-developed tool couldn't compare to one developed professionally? In this post, we wanted to look into two alternatives for VLSI layout; Magic (an open-source tool) and Cadence Virtuoso (a commercial tool). Looking into this, we specifically wanted to explore the process of designing a NAND gate as a benchmark.
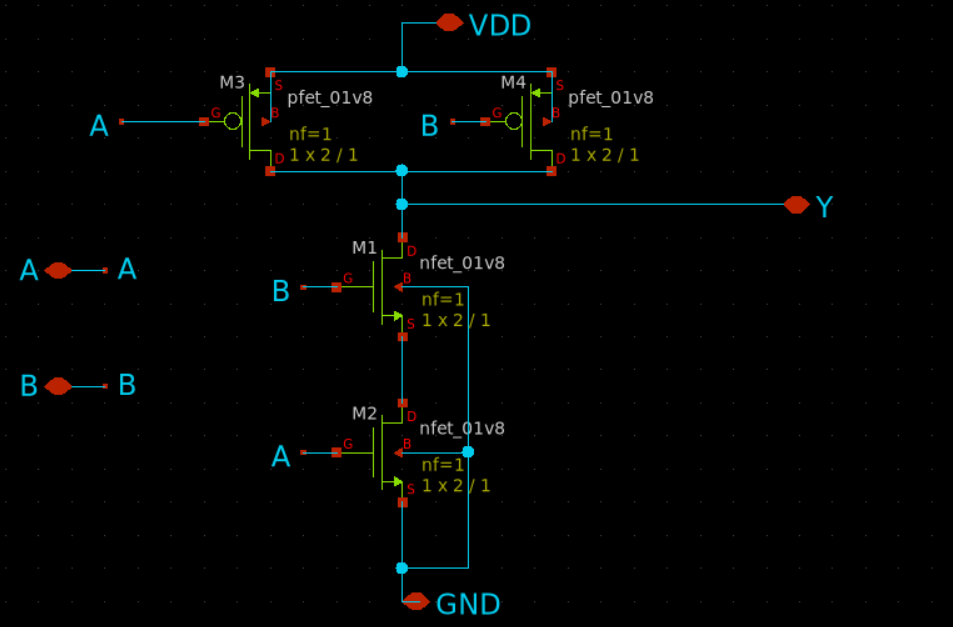
Schematic of a NAND gate in Cadence Virtuoso
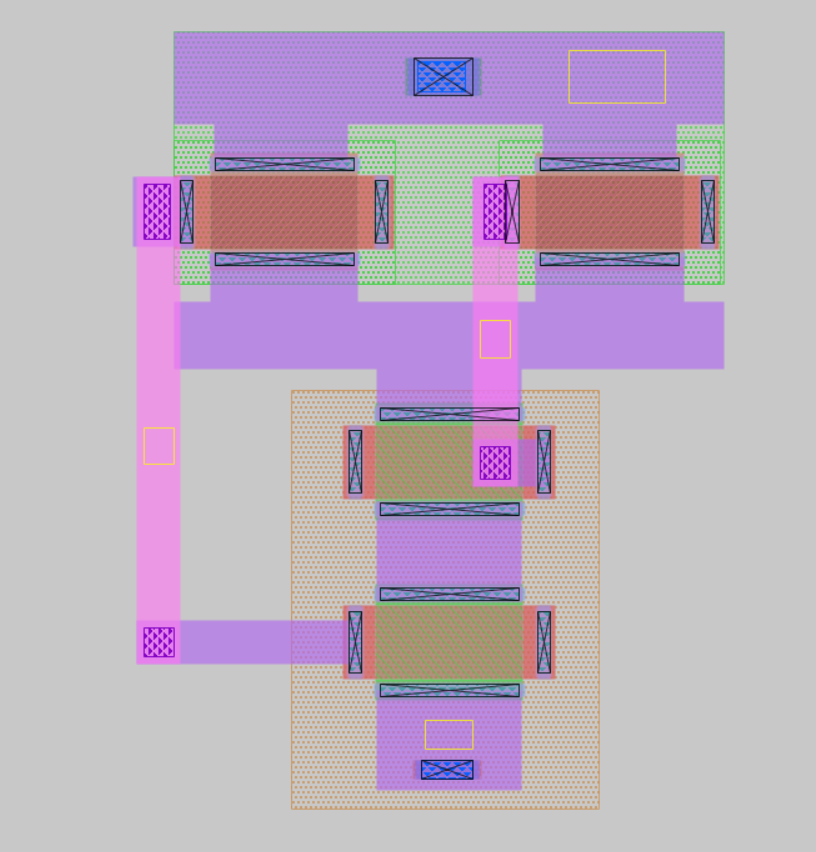
When designing a NAND gate in Cadence, we first begin with defining our schematic. You can see above that we've made this with two parallel pMOS devices in the pull-up network (PUN) and two series nMOS devices in the pull-down network (PDN) in order to correctly implement a NAND gate. From here, we can natively use the schematic to create our layout, avoiding any possible errors in conversion. Cadence Virtuoso has many tools for interacting with the layout area, allowing the user to intuitively move, stretch, and design with different layers. Lower-level devices are automatically grouped, so that they can be moved as one unit. This allows us to make the finalized layout that can be seen on the left. The large teal box represents our “bounding box”, to represent how much area our device could be expected to take up on a chip (noting that power and ground can be shared). We have our 4 devices as well; two nMOS on the top, and two pMOS on the bottom. Cadence intuitively noticed that we could share diffusion with these devices, so when dragging them close, they were automatically merged into one. (Note that we are currently missing connections, or “taps”, to our substrate and well, as this gate was designed to be used as part of a larger circuit).
Layout of a NAND gate in Cadence Virtuoso
Finally, we can additionally conduct our DRC (Design Rule Check) and LVS (Layout vs. Schematic) checks, to verify that our design can be fabricated, and is an accurate representation of our schematic, respectively. DRC checks are usually straightforward, and are included as part of the PDK. However, since Cadence is entirely self-integrated, LVS can be easily done with a few button-presses in their menu to compare our schematic and layout views of our circuits. Finally, Cadence allows us to easily extract the circuit to test with parasitics.
To design the same NAND gate in MAGIC, many more steps and software are required. Whereas in Cadence, all the tools are integrated into one overall package, the tools needed to create the schematic, layout, and then LVS check the schematic and to the layout are all separated in their own software, Xschem, Magic VSLI, and Netgen.
To first construct the NAND gate we first open up the schematic capture Xschem and create the NAND with the parallel pmos pullup network and the series nmos pull down structure.
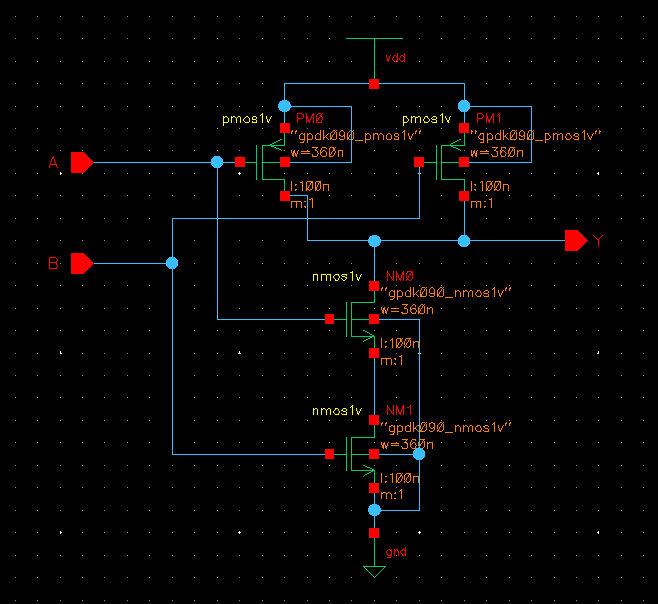
Schematic of a NAND gate in Magic VLSI
From this schematic of the NAND, we can now progress into Magic and start the layout. To start the layout we can do one of two things: you can import the spice netlist of the schematic into Magic to generate all the device instances, or each device can be instantiated by hand. For the purposes of this post and since the 2 input NAND structure is only four transistors, I will instantiate by hand.
To go about painting the metal layers, Magic uses a box system where you define the top right corner and the bottom left corner. With these two points you can then paint whichever layer you want, and from this create any sort of layout.
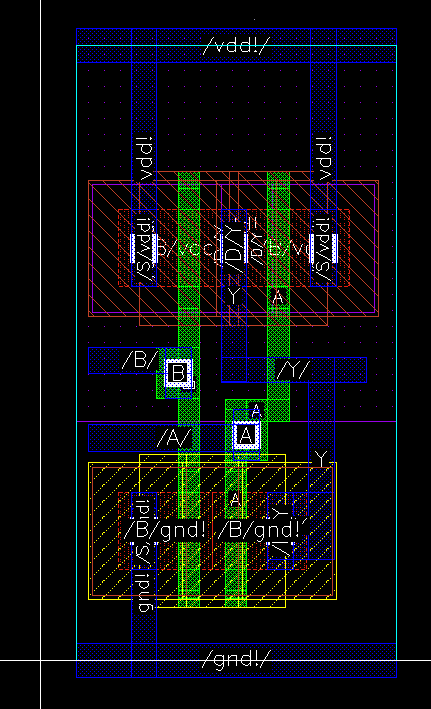
Layout of a NAND gate in Magic VLSI
From the photo above, it is clear that Magic and Cadence implement their layout tools similarly. Every layer in the process stack has its own associated color/patterning to make it distinguishable from the other layers. What makes the tools different comes from the quality of life features that Cadence has, or the lack of them in Magic. In Magic the only information that you are creating an okay layout is its DRC checker. However, these are displayed by small white dots, so they can be easy to overlook.
From here, to make sure that this device properly implements the NAND schematic from Xschem, we will first have to extract the netlist from Magic, and then use the program Netgen, which will read the spice netlist saved from Xschem and compare it to the one from Magic.
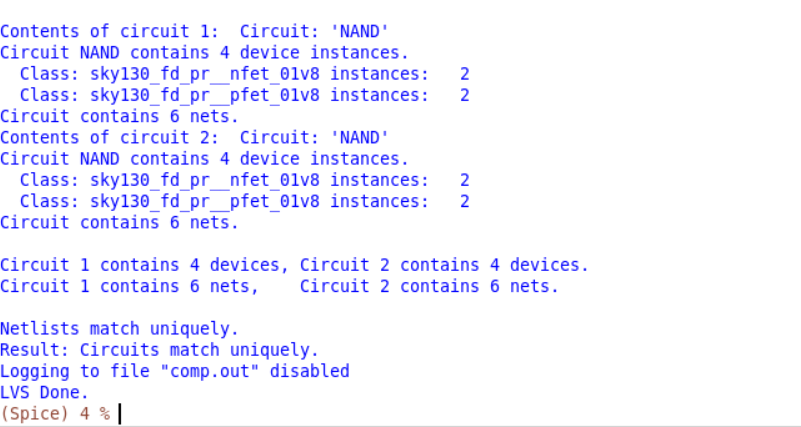
Comparison of netlists using Netgen
Knowing all of this, we can begin to understand which is 'better'. Most designers will agree that Cadence Virtuoso has more functionality and better integration. Their tools are designed to work well together, and a lot of engineering has gone into making sure that there are no hiccups along the entire flow. In contrast, Magic is part of a larger set of tools required to implement a complete analog flow. There is no unified engineering team designing them, but rather community members designing tools how they personally envision them. This can lead to complications when transitioning from one to the other; our team spent a significant amount of time working to debug an issue where Xchem gave a netlist in an order that Magic didn't expect, causing issues. Additionally, commercial tools often come with a lot more support. Cadence Virtuoso has a team of engineers ready to help their clients if any issues arise, as paying for the tools guarantees you some assurance that they will function. Open-source tools, in contrast, are often developed by members of the community at large, who are volunteering their time and effort to create something for others to use. This comes with no assurance of functionality, as well as variable levels of support, depending on what the designer wants to provide.
Along with better functionality and support, since Cadence is developed and supported by a dedicated team, the documentation for Cadence is readily available for those who have access to the program. Another benefit towards the commercial nature of Cadence Virtuoso is the ease of use. Although there are many steps in the process of creating circuits, simulating them and then laying out, the use of Cadence is much easier to get into from the start. With Magic and Xschem, you are provided a simple UI to start the design, but besides this, the rest of the software is done from text boxes and command prompts. In Cadence however, although everything can be done through the CIW, the process of creating an elaborate simulation is made easy by its ADE window (for analog design) as every type of simulation, transient, ac, etc, has its own UI that only requires specific inputs. From this, one still needs to have an understanding of how spice works, but unlike Xschem and writing NGspice, it is very easy to start setting up simulations. Comparing this to the open-source tools, since everything is separated into its own program, to acquire the knowledge to even start can be a challenge to find as it is located in each program's documentation (which may or may not be up to date) or hidden somewhere on a forum. Once these obstacles are passed, however, the use of these open-source tools are surprisingly powerful.
Open-source design doesn't come without its advantages, the first of which is accessibility. A common theme among design tools is the fact that they are often surrounded by many restrictions. If you want to be able to use Cadence Virtuoso, you have to pay to use it; with a minimum price tag of $15,000, many users aren't able to access the tool outside of industry. In addition, many of the other commercial products that are used by Cadence (such as Process Design Kits, or PDKS) are subject to NDA's (Non-Disclosure Agreements) that anyone who wants to use the product must sign and go through before using. These NDA's are often difficult to get for individual use, and can additionally be subject to export control, limiting who can sign them based on your home country. In contrast, anyone is able to download and install Magic. This significantly lowers the boundary to entry for analog design; anyone is able to start designing without having to pay or go through paperwork. For many designers, this is the draw to open-source. Instead of having to jump through hoops to start, you can sit down and start designing, iterating and engineering immediately.
However, a possibly more subtle advantage of open-source tools is extensibility. With tools like Cadence Virtuoso, you as a designer are usually stuck with what the tools have to offer; it comes in a pre-made, unmodifiable setup. If you want or need more functionality for your project, you may be out of luck (or have to pay more for additions). This is the exact opposite of the case for open-source tools like Magic. By definition, the source code is available (including for Magic). Anyone is able to not only see the code, but to modify it how they need it, and even submit their modifications to be used in the official version. This also has the side-effect that the designers of the tools are more available for communication. Our team has been in communication throughout our design process with Magic's current maintainer, Tim Edwards, who has greatly assisted us in being able to use and understand the tool.
Neither tool is applicable globally. For large companies, using industry standards with extensive functionality is appealing due to the support they are guaranteed, the completeness of documentation, and the reliability of the package. However, for at-home hobbyist designers, open-source is a great way to try out your designs without having to commit to a large investment. The open-source community is rich with enthusiastic members who are able to contribute and help where they can, and the environment has reached a point where much of the desired functionality is flushed out and tools will function reliably. And hey, if there's something you need, you can always put on your engineering hat and make it for yourself and others.